Every major blog is using FeedBurner to burn their RSS feeds because it is a free feature rich system that you cannot turn down. FeedBurner provides statistics, feed optimization option, feed publication option and much more. Integrating FeedBurner and Google Analytics is a must for every blog. In this article, I will show you how you can setup your blog feeds with FeedBurner and use it to help take your blog to the next level.
Why FeedBurner is Important for Bloggers?
FeedBurner is a free service that is loaded with options. Some of the features include:
- Statistics about your RSS Subscribers so you can analyze and optimize your blog posts.
- Give your users multiple options to subscribe such as Email, and other feed-readers (Netvibes, Google etc).
- Social Proof (Subscriber count)
- Option to customize your feeds such as modify post headings, branding and more.
- Option to ping various feed-reading services once you publish your posts.
- Integrate Google Adsense to monetize your RSS feeds.
- And more…
Just with the short list of features, you can see that it is a must have for all blogs. Now we can move onto setting up the FeedBurner Account.
Setting up Your FeedBurner for Your blog feeds
First you will need to have a Google account (any gmail account will work). Visit the feedburner service page to begin this process.
In the first step, you will type the link to your blog feed. For example: http://example.com/feed
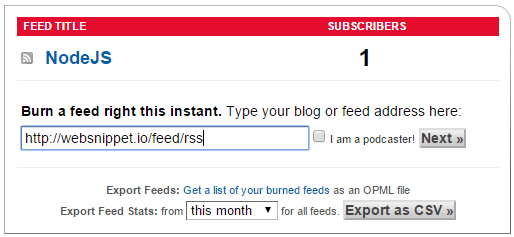
In step 2, you will choose the title of your Feed and the address of your feed. It is advised to keep the title of your feed the same as your blog. It is best to keep your feed address short and memorable.

Technically your feeds are created, so you don’t need to follow the steps any more. Click on the Skip directly to Feed Management

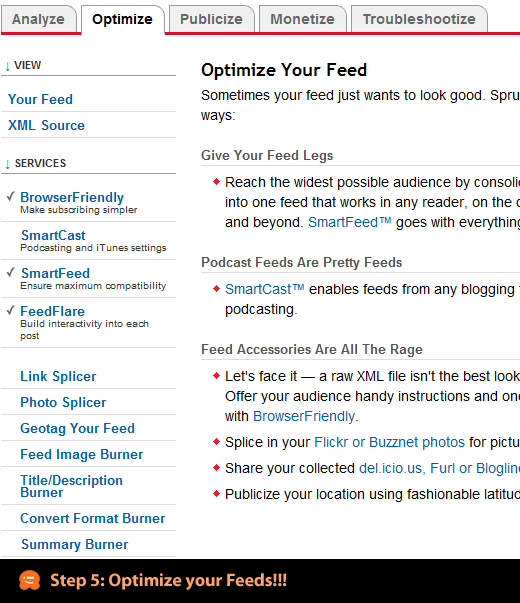
You will see a page with a link to tons of blogging platforms. Ignore all that as we will revisit them later in this article. Just cilck on the optimize tab that you see in the image below.
In step 5, we will work on optimizing your Website Blog Feed. You need to make sure that you haev Browser Friendly option activated, Smart Feed activated, and FeedFlare activated. You can activate other services if you want, but these 3 services are a must have. BrowserFriendly makes subscribing much simpler. SmartFeed ensures maximum compatibility with all feed reader applications. FeedFlare builds interactivity into posts by adding email this and other sharing options.
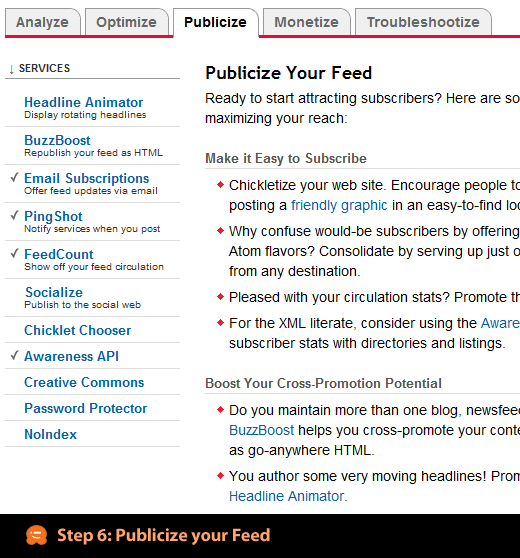
In step 6, we will take a look at all the publicize options for the feed. You need to allow Email Subscriptions on your site because there are users who prefer to get email updates rather than using Google reader. Pingshot must be activated because it notifies services when you post. Feedcount widget lets you show off your subscriber count. It is one of the best social proof methods. Awareness API comes handy if you are trying to list yourself on sites like BuySellAds because they can extract your subscriber count easily. There other snazzy options like Headline Animator, BuzzBoost that you can activate if you like.
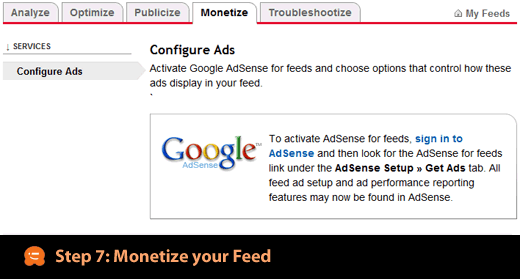
Monetizing your feed is another good features of FeedBurner except it only allows you to use Google Adsense. So sign up with Google Adsense and follow their direction.
Once you have done all the above steps, you can click on the Analyze tab. Most likely you will see a screen like the one below because the stats are not recorded. Give it up to 24 hours and you will start seeing numbers there. Use the subscriber count, clicks and other useful data to improve your blog. See what your users like and don’t like with this stas, and then focus on the type of posts that your users like and enjoy.

Integrate FeedBurner into Your Blog
Even though you have setup your feed with FeedBurner in the steps above, but you have not yet really integrated it with Website yet. First thing you want to do is stop diluting your feed and make it one. You need to create a redirect, so when users try to visit yourdomain.com/feed/ they are redirected to your feedburner feed page. This way you can keep track of the subscribers on your blog.
Add the Email Subscribe Box on your site
First visit Publicize » Email Subscriptions then copy and paste the code they give you in the template file that you like. Remember to customize the look of your email form, you would need to have prior knowledge of HTML and CSS.
If your blog does not have FeedBurner feeds, then get it right now.